Oh, am I excited to share this with you! I’m an absolute planner addict, but I struggled to find a planner that “gets” SLPs. I created pages that will help us stay organized and manage our ever-growing workload. Check out the Ultimate SLP Planner on Teachers Pay Teachers–just updated for the 2017-2018 school year!
NOTE: The links below are Amazon Affiliate links for your convenience, but I may receive compensation if you click through and purchase one of the products. *
I created this planner because I needed a tool to keep everything in one place. I needed a planner that could help me manage my schedule, my speech therapy caseload, my professional development, and more–really all things related to my life as a school-based SLP. I bought some big, fancy planners (which I love), but they didn’t do much to help me manage my caseload.

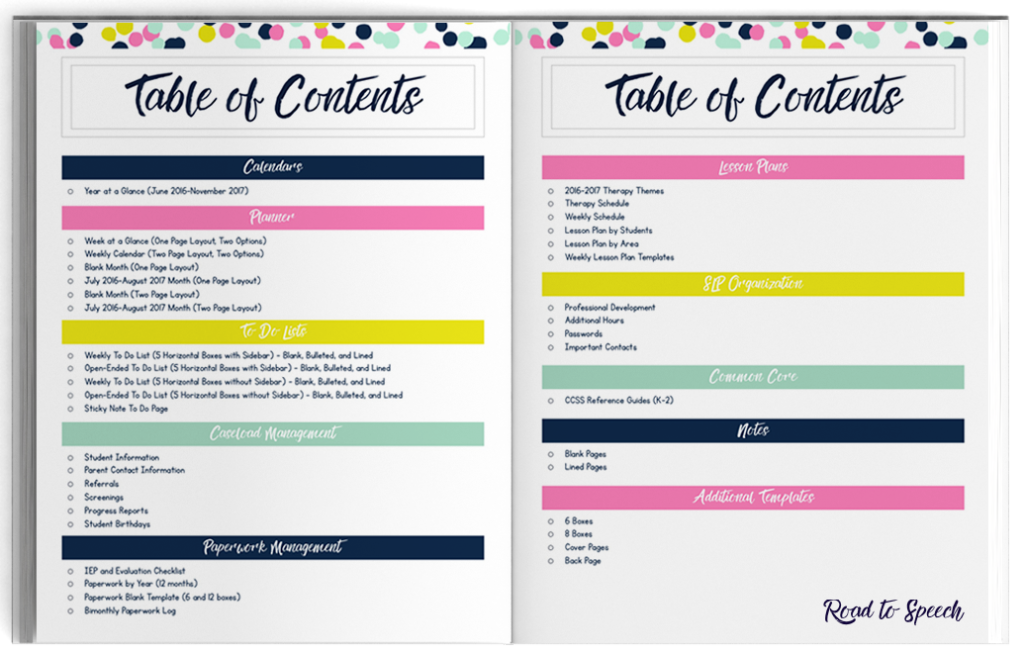
The planner includes 126 pages to help you get (and stay!) organized, including…
A Year at a Glance Calendar (June 2016-November 2017)
Monthly Calendars (One- and two-page layouts)
Week at a Glance Planners (Four different options)
To Do Lists (Many different options)
Caseload Management Sheets (Student information, parent contact sheets, referral/screening logs, progress report logs, student birthdays)
Paperwork Management Sheets (e.g., IEP/evaluation checklists, paperwork logs)
Lesson Plan Organizers (e.g., year overview, therapy schedule, weekly schedule, weekly lesson plan templates, and more)
SLP Organization Tools (Professional development logs, additional hours worked, passwords, contacts)
Common Core Guides (K-2, more coming soon!)
Notes Pages
Additional Blank Templates
So. Much. Stuff. Take a peek here!
The download includes a mega 126-page PDF file.
But guess what? I also made you an editable PowerPoint document, which will allow you to fully customize your planner (including TONS of editable text fields). I also made a video tutorial to walk you through the editing process.
• • • • • • • • • • • • • • • • • • • • • • • • • • • • • • • •
If you’re as excited about this as I am, then download the planner now!
• • • • • • • • • • • • • • • • • • • • • • • • • • • • • • • •
Downloaded! So how do I assemble this planner?
I printed out my planner (double-sided) and laminated the front and back pages. This will help with durability and I can write on the covers using my Sharpie markers. Perfect for quick “to do” lists!
This was definitely a splurge, but I also purchased my very own binding machine (affiliate links below). You know what’s cool about this binding machine, though?! It’s super simple to open and close the binding, so I can add/remove pages throughout the year.
You can also bring your planner to your local office supply/printing store, and you can get it bound for a few dollars. Or an even simpler option is to buy a 3-ring binder!
Here are links to a few of my favorite DIY options:


Leave a Reply